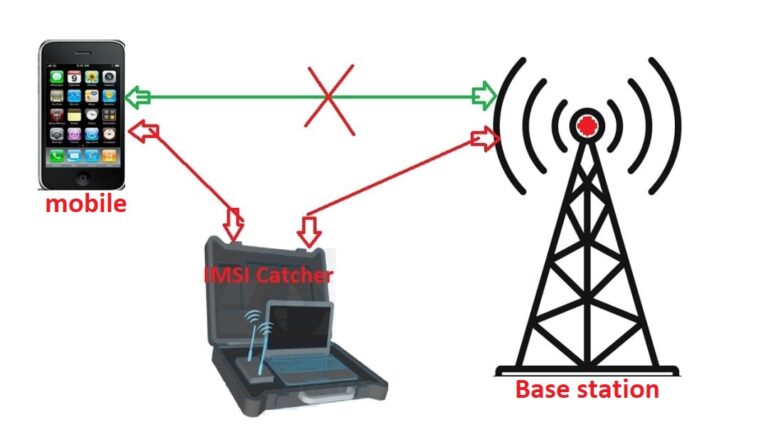
Create Own Cellular Network For A Active IMSI Catcher
YateBTS is an open-source software implementation of a GSM base station. It allows individuals and organizations to set up their own cellular network using off-the-shelf hardware and software. In this article, we will discuss what YateBTS is, its features, and how to install it.
What is YateBTS?
YateBTS is a software implementation of a GSM base station that runs on commodity hardware such as a PC or a Raspberry Pi. It is designed to provide a low-cost and flexible solution for setting up a private cellular network. With YateBTS, you can create a network that is independent of commercial operators and is under your control.
YateBTS supports both 2G and 4G LTE networks. It can be used for a variety of applications, including rural connectivity, disaster response, and private communication networks. It is particularly useful in areas where there is limited or no commercial coverage, such as rural areas or developing countries.
How to install YateBTS
To install YateBTS, you will need the following:
An Ethernet cable to connect the SDR device to the computer.
A computer or Raspberry Pi with a minimum of 2GB RAM and a dual-core CPU.
An SDR (Software-Defined Radio) device such as a USRP or BladeRF.
A SIM card.
A power supply for the SDR device.
Here are the steps to install YateBTS:
Step 1: Install Ubuntu
YateBTS runs on Ubuntu Linux, so the first step is to install Ubuntu on your computer or Raspberry Pi. You can download the latest version of Ubuntu from the official website and follow the installation instructions.
Step 2: Install YateBTS dependencies
Before you can install YateBTS, you need to install its dependencies. Open the terminal and run the following command:
sudo apt-get install build-essential libboost-all-dev libusb-1.0-0-dev libsqlite3-dev libssl-dev libpcap-dev git
This will install all the necessary dependencies.
Step 3: Clone the YateBTS repository
Next, you need to clone the YateBTS repository. Run the following command:
git clone <git link>
This will clone the repository to your local machine.
Step 4: Build and install YateBTS
Once you have cloned the repository, navigate to the YateBTS directory and run the following commands.
Generic dependencies
sudo apt install subversion autoconf libgsm1-dev libgusb-dev libusb-1.0-0 libusb-1.0-0-dev gcc g++ make
If you want the optional YateBTS web interface, install the following. Note that this tutorial assumes you have already done this:
Web dependencies
sudo add-apt-repository ppa:ondrej/php
sudo apt update
sudo apt install php5.6 apache2
For the bladeRF, execute the following commands:
sudo add-apt-repository ppa:bladerf/bladerf
sudo apt update
sudo apt install bladerf
sudo apt install libbladerf-dev
sudo apt-get install bladerf-fpga-hostedxa4
For the N210, execute the following command:
sudo apt install libuhd-dev libuhd003.010.003 uhd-host
Create a Yate Group: YateBTS uses a group called “yate” to handle permissions. To create this group and add your account to it, execute the following commands:
sudo addgroup yate
sudo usermod -a -G yate <username>
Install Yate: For N210, install Yate to the system using subversion to fetch the code. Make sure to use the correct version of the code when installing with the “-r 5968” argument.
svn checkout -r 5968 http://voip.null.ro/svn/yate/trunk yate
cd yate
./autogen.sh
./configure
sudo make install-noapi
If you encounter an OpenSSL error during the building process, make a minor patch in the file “./yate/modules/openssl.cpp” based on the instructions given in that file.
For bladeRF, download the tar file that includes Yate, YateBTS, and bladeRF FPGA images from Nuand. Execute the following commands:
wget https://nuand.com/downloads/yate-rc-3.tar.gz
mkdir yate-bts && tar -xf yate-rc-3.tar.gz -C yate-bts
cd yate-bts/yate
sudo ./autogen.sh
sudo ./configure –prefix=/usr/local
sudo make
sudo make install-noapi
sudo ldconfig
Install YateBTS: To install YateBTS, use our modified codebase for YateBTS which we have confirmed works with the N210:
git clone https://github.com/grant-h/YateBTS-USRP
cd YateBTS-USRP
./autogen.sh
./configure
sudo make install
If you get a complaint about the bladeRF library, uninstall bladeRF from your system, rerun the command, then reinstall bladeRF.
For bladeRF, execute the following commands:
cd ../ && cd yatebts
sudo ./autogen.sh
sudo ./configure –prefix=/usr/local
sudp make
sudo make install
sudo ldconfig
Add/Edit Files: To use the yate group, change the owner of the configuration files from root to yate. Execute the following commands:
sudo touch /usr/local/etc/yate/snmp_data.conf /usr/local/etc/yate/tmsidata.conf
sudo chown root:yate /usr/local/etc/yate/*.conf
sudo chmod -R a+rw /usr/local/etc/yate
Link Web GUI to Apache (optional): If you prefer to use the local Web GUI as an alternative to editing files, you can link the required files to the directory used by Apache for hosting web pages. For the N210, execute.
Enter the web directory: cd /var/www/html
bladeRF » sudo ln -s /usr/local/share/yate/nipc_web/ nipc
N210 » sudo ln -s /usr/local/share/yate/nib_web/ nib
Running YateBTS
bladeRF
Before running Yate, we should load the FPGA image that matches your device. These files exist in the yate-rc the directory that we downloaded from Nuand. To load the image, run bladeRF-cli -l /your-path/yate-rc/hostedx40.rf. You can simply change hostedx40.rbf to hostedx115.rbf if you’re using a bladeRF x115.
Run
If the above installation was successful, you can start YateBTS with the command sudo yate (sudo is required for real-time thread priority).
Make sure your computer supports USB 3.0 SS, and that the bladeRF is plugged directly into the bus (not through a hub or a front port). Also make sure that your Yate CPU usage isn’t stuck close to 100%, otherwise, TX frames may be dropped.
Conclusion
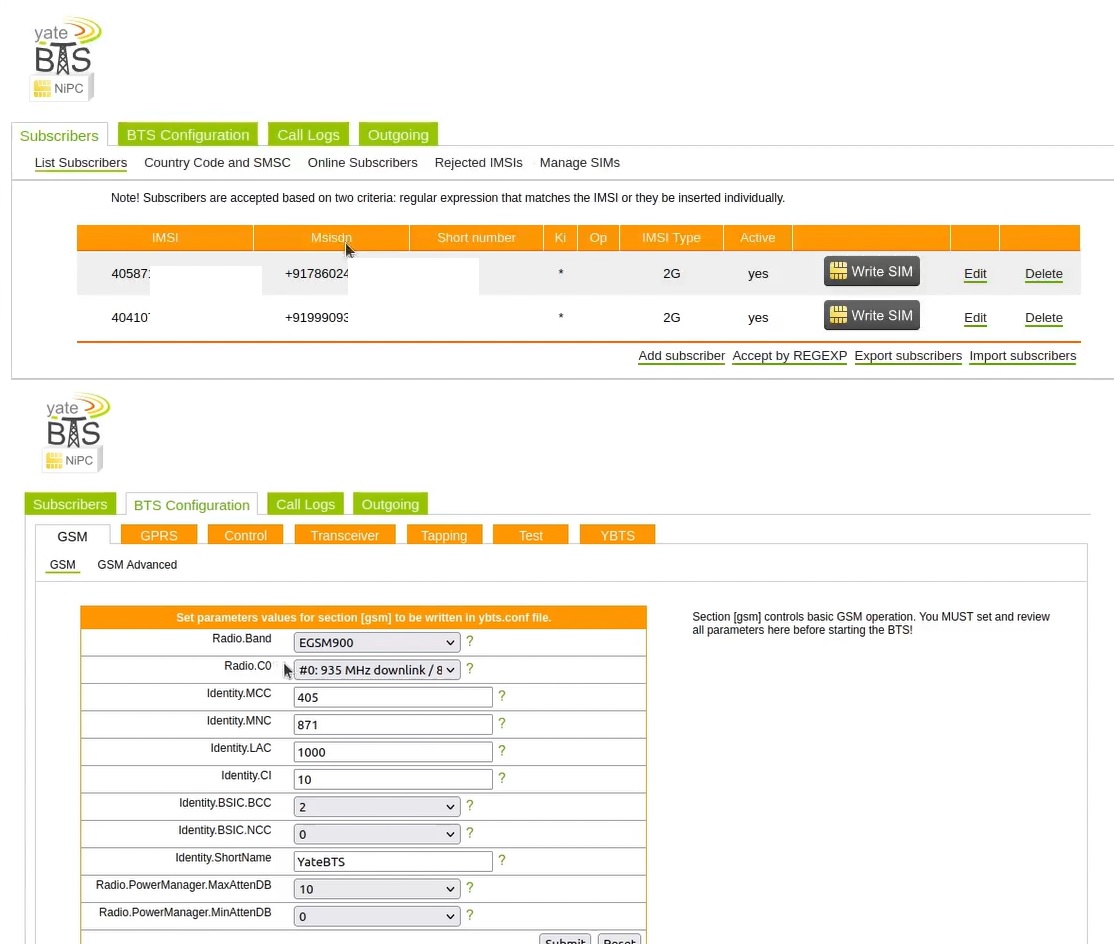
Based on the given text, the conclusion would be that the instructions provided detail the steps to install and configure YateBTS, a software suite that enables the creation of GSM networks using software-defined radios (SDRs). The instructions include installing dependencies, creating a Yate group, installing Yate and YateBTS, adding/editing files, and configuring the BTS. Additionally, there is information on how to access the YateBTS web interface and change settings such as subscribers and RAN settings. Overall, the instructions aim to provide a comprehensive guide to setting up YateBTS with either N210 or bladeRF SDRs.